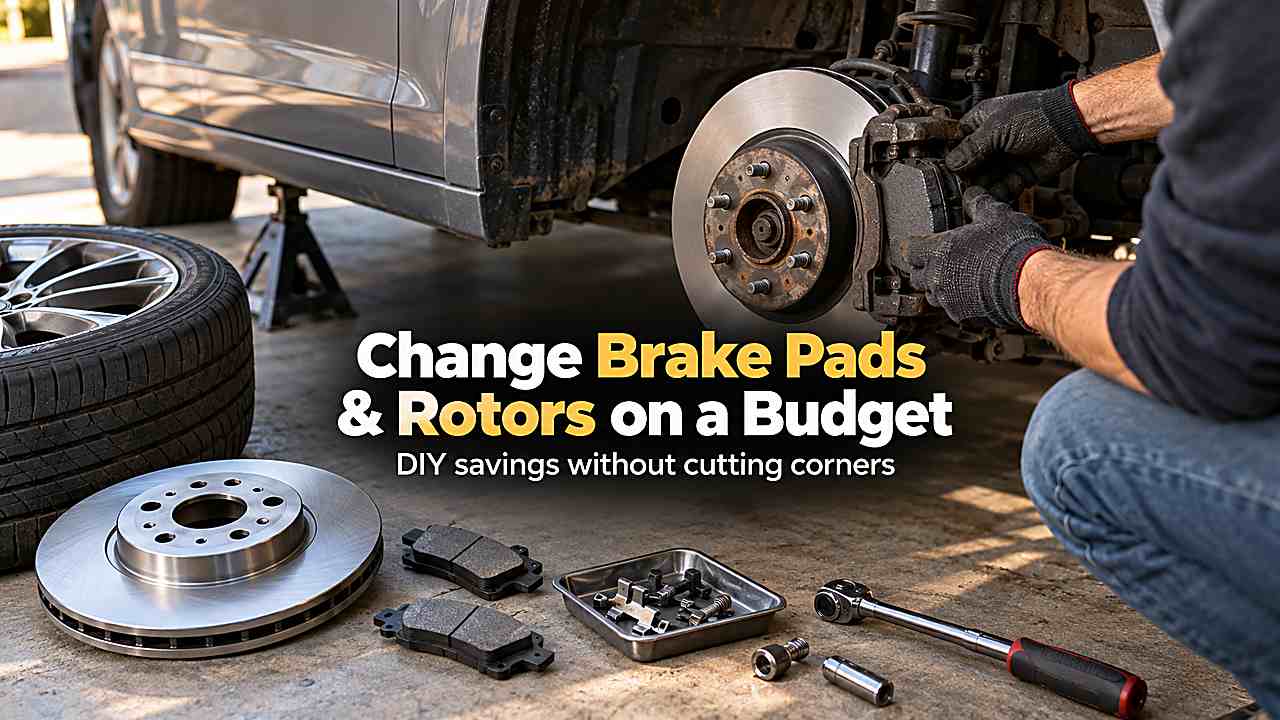
The cheapest safe brake job is a DIY pad-and-rotor replacement using reputable mid-grade parts, the correct tools and the vehicle’s service procedure. You can save most of the labor cost, but you should not reuse damaged hardware, guess torque values or skip inspection of calipers, hoses and fluid just to hit a budget.
If the brake pedal is soft, the caliper is leaking, parking-brake hardware is complex or you are not comfortable lifting the vehicle safely, paying for professional work is cheaper than a brake failure.
Save money by buying quality matched pads and rotors, doing the labor yourself and reusing only serviceable hardware. Do not save money by using unknown brake parts, skipping torque specifications or ignoring a seized caliper.
Confirm the vehicle actually needs pads and rotors
Measure pad thickness and inspect rotor condition before ordering. Deep scoring, severe rust, heat cracking and thickness below specification require rotor replacement.
Some rotors can technically be resurfaced, but inexpensive modern rotors often cost little more than machining. Your best result comes from matching capacity to the task with some margin. Running tools continuously at their limit creates heat, wear and frustration even when the specification says the job is technically possible.
Buy matched mid-grade parts instead of the cheapest listing
A reputable coated rotor and ceramic or semi-metallic pad matched to the vehicle offers better consistency than an unknown marketplace kit. Premium racing parts are unnecessary for a normal commuter.
Compare warranty, coating and friction formulation rather than only price. That detail matters because it changes how safely and efficiently the job can be completed. You should choose the tool or method around the actual vehicle and working conditions rather than a headline specification.
What this means for your setup
Good preparation also reduces the amount of expensive equipment you need. Clean surfaces, correct access and a clear workflow often matter more than buying the most powerful version of every tool. When safety is involved, manufacturer procedures and rated equipment take priority over internet shortcuts. Saving a few minutes is never worth creating a lifting, electrical or braking hazard.
Buy parts by VIN or exact brake package
Many cars use different rotor diameters or calipers within the same model year. Confirm engine, trim and brake option codes.
Returning the wrong rotors after the car is on stands is not a budget strategy. A controlled process is usually faster in the end because it prevents rework. If one step begins behaving differently from what you expect, stop and inspect before adding more force, heat, pressure or chemical strength.
Use safe lifting equipment
Loosen lug nuts before lifting, use the approved jack points and support the car on stands. Never work on brakes with the vehicle supported only by the jack.
Chock the opposite wheels. Good preparation also reduces the amount of expensive equipment you need. Clean surfaces, correct access and a clear workflow often matter more than buying the most powerful version of every tool.
Inspect before compressing the caliper
Look for torn slide-pin boots, leaking piston seals, cracked hoses and uneven old pad wear. A seized slide or piston can destroy new pads quickly.
Fix the cause before installing fresh friction material. Think about storage and repeat use as well as the immediate job. A product that works perfectly once but is awkward to store, service or replace can become a poor home-garage choice over time.
What this means for your setup
Your best result comes from matching capacity to the task with some margin. Running tools continuously at their limit creates heat, wear and frustration even when the specification says the job is technically possible. A controlled process is usually faster in the end because it prevents rework. If one step begins behaving differently from what you expect, stop and inspect before adding more force, heat, pressure or chemical strength.
Clean and lubricate only the correct areas
Remove rust from the hub face so the new rotor sits flat. Clean new rotors with brake cleaner when required. Use brake-specific lubricant sparingly on slide pins and metal contact points.
Never put grease on rotor or pad friction surfaces. When safety is involved, manufacturer procedures and rated equipment take priority over internet shortcuts. Saving a few minutes is never worth creating a lifting, electrical or braking hazard.
Torque matters
Caliper bracket bolts and wheel lugs have specified torque. Under-tightening can be dangerous; overtightening can damage threads or distort components. Use a torque wrench and vehicle service data.
Do not assume every bolt should be attacked with an impact. Your best result comes from matching capacity to the task with some margin. Running tools continuously at their limit creates heat, wear and frustration even when the specification says the job is technically possible.
Bed the pads according to the manufacturer
New pads and rotors need a controlled transfer layer. Follow the brake manufacturer’s bedding procedure, which usually involves a sequence of moderate stops with cooling.
Avoid sitting stationary with very hot brakes immediately after hard bedding stops. That detail matters because it changes how safely and efficiently the job can be completed. You should choose the tool or method around the actual vehicle and working conditions rather than a headline specification.
What this means for your setup
Good preparation also reduces the amount of expensive equipment you need. Clean surfaces, correct access and a clear workflow often matter more than buying the most powerful version of every tool. When safety is involved, manufacturer procedures and rated equipment take priority over internet shortcuts. Saving a few minutes is never worth creating a lifting, electrical or braking hazard.
Compare DIY savings honestly
Include the cost of a jack, stands, torque wrench, brake cleaner and specialty tools if you do not already own them. Those tools continue to pay off on future jobs.
For a single brake job, a shop quote may be closer than expected once tool purchases are included. A controlled process is usually faster in the end because it prevents rework. If one step begins behaving differently from what you expect, stop and inspect before adding more force, heat, pressure or chemical strength.
Know when bleeding is necessary
A standard pad-and-rotor change does not usually open the hydraulic system, so bleeding may not be required. If you replace a caliper or open a brake line, air must be removed.
A soft pedal after the job needs diagnosis before driving. Good preparation also reduces the amount of expensive equipment you need. Clean surfaces, correct access and a clear workflow often matter more than buying the most powerful version of every tool.
Common mistakes that cost more later
That detail matters because it changes how safely and efficiently the job can be completed. You should choose the tool or method around the actual vehicle and working conditions rather than a headline specification. Good preparation also reduces the amount of expensive equipment you need. Clean surfaces, correct access and a clear workflow often matter more than buying the most powerful version of every tool.
Do one side at a time so the other remains a reference
Leaving the opposite brake assembled gives you a visual reference for hardware orientation, clips and hose routing. Photograph the original setup before removing springs or abutment clips. This is especially helpful on rear parking-brake assemblies.
Never let the caliper hang from the flexible hose. Support it with a hook or wire while you work. A damaged hose can create a brake pull or failure that costs far more than the budget saved on labor.
Price the complete axle job before taking the car apart
Include pads, two rotors, hardware kit, brake cleaner, lubricant and any specialty piston tool. Rear electronic parking brakes may require a scan tool or mechanical service procedure. If a caliper or hose shows trouble during inspection, the budget needs to account for it before you continue.
Online kits can save money, but shipping a wrong rotor back after the car is disassembled can cost time. Confirm rotor diameter and brake option using VIN data or a reliable parts catalog.
Keep the old parts until the new brakes pass a road test
Do not discard the original pads, hardware and rotors until the vehicle is fully reassembled, the pedal is firm and the test drive is complete. The old hardware can help identify orientation mistakes or part differences if something does not fit. Once the new brakes are confirmed, recycle rotors and dispose of worn parts appropriately.
After the first road test, inspect for leaks, abnormal heat, scraping and wheel-lug torque. Recheck anything that sounds or smells unusual before continuing to drive. A budget brake job is successful only when the car stops correctly and predictably.
Budget for one unexpected part before you begin
Brake jobs often uncover a torn slide-pin boot, seized guide pin, damaged hardware or worn hose that was not obvious before disassembly. Set aside a small contingency rather than buying the absolute cheapest parts and having no room left for a real defect. If the caliper cannot move freely or the hose is questionable, replacing that component is part of doing the job correctly. A safe budget includes enough margin to repair what inspection actually finds.
Frequently Asked Questions
Budget brake work is safe when you save on labor and unnecessary premium parts, not when you remove steps that control the wheel or hydraulic system.
Should you replace rotors every time you replace pads?
Not always. Rotors can be reused if they remain above minimum thickness, are not badly scored or warped and meet the vehicle’s service specifications.
Many DIY owners replace them because modern rotors are relatively affordable. A controlled process is usually faster in the end because it prevents rework. If one step begins behaving differently from what you expect, stop and inspect before adding more force, heat, pressure or chemical strength.
Are cheap brake pads safe?
Unknown no-name friction parts are not worth the risk. Reputable economy or mid-grade pads from established manufacturers can be perfectly appropriate for normal driving.
Match the pad type to the vehicle and use. Good preparation also reduces the amount of expensive equipment you need. Clean surfaces, correct access and a clear workflow often matter more than buying the most powerful version of every tool.
Can you change pads and rotors with basic tools?
Yes, but you still need safe lifting equipment, sockets, a torque wrench, piston-compression tool and brake-cleaning supplies. Some rear electronic parking-brake systems require scan-tool service mode.
Check the procedure first. Think about storage and repeat use as well as the immediate job. A product that works perfectly once but is awkward to store, service or replace can become a poor home-garage choice over time.
Do you need to open the brake-fluid reservoir when compressing pistons?
You should monitor fluid level because pushing pistons back can raise it. If the reservoir was previously topped off with worn pads, it may overflow. Do not contaminate the fluid.
Follow the service procedure. When safety is involved, manufacturer procedures and rated equipment take priority over internet shortcuts. Saving a few minutes is never worth creating a lifting, electrical or braking hazard.
How long should new brakes be bedded in?
There is no universal number of stops because friction manufacturers specify different procedures. Follow the pad instructions.
The goal is to establish an even transfer layer without overheating the brakes. Your best result comes from matching capacity to the task with some margin. Running tools continuously at their limit creates heat, wear and frustration even when the specification says the job is technically possible.
Conclusion
Save money by buying quality matched pads and rotors, doing the labor yourself and reusing only serviceable hardware. Do not save money by using unknown brake parts, skipping torque specifications or ignoring a seized caliper. The safest and most cost-effective result comes from choosing capacity and technique for the real job rather than buying or using more than the situation requires.
If the vehicle, tool or procedure falls outside what you can verify confidently, use the manufacturer’s service information or a qualified technician. Good garage work is repeatable, controlled and safe.